It is time to ditch the SSH and move onto Netmiko that would actually be used in most production networks, which involves a bit more than “enable ssh” if you have not turned it on before / turned off telnet, but I will demo it here of course via Automation!
I am still continuing on with my same lab and just building on top of it, and the NetworkAutomation Host still has its same scripts, however I will be taking old scripts from VSC and editing them to automate pushing SSH / disabling Telnet to all network devices in this lab.
Please do not ever try to Automate remote access to network devices on a production network, I only did this in the lab because it is a lab!
This lab of course includes Automation because I am doing Automation, but it is also how you can secure your network devices by updating them to SSHv2 and disabled Telnet.
When doing this though, always leave your Telnet session Active until you confirm you are able to log into the device via SSH, and have all credentials and changes saved!
For this I am going to alter my initial script to manually create VLANs
Remember this one:

This is why I keep every script separate, as you can piece together new scripts using existing scripts, like the one I created below that will Enable SSHv2 and Disable Telnet:

I used loopedback.com as the ip domain-name required to generate the RSA cert, created a “crypto key generate rsa” 2048 bit size, then use the “n\” to essentially hit ‘enter’ to confirm creating the key.
So if you want to enable SSHv2 and Disable Telnet on your network devices:
- Establish a Telnet session, and don’t close it until you are 100000% sure your SSH config is correct and any credential changes are saved, then check again!
- Issue the command “ip domain-name (something)” in Global Config, using the domain name of the customers domain name
- Issue “crypto key generate rsa” which then prompts you for a key size, I use 2048 as stronger encryption is never a bad thing for security!
- Issue “ip ssh ver 2” to bring you SSH version up to 2 to better secure your devices!
- Go into your VTY Lines and and issue “transport input ssh” to tell the device only to accept SSH connections to VTY lines
- These changes will NOT drop your existing Telnet session so keep it open!
It is incredibly embarassing as a Network Engineer making remote changes to secure devices in the network, and have to get someone physically cabled into the console port because you jumped the gun / didn’t save the config / didn’t save new creds.
Point being – I automated it in a lab for fun, but you should enable SSH on your network devices to secure your network, but you should be very careful and deliberate with it!
/lecture 🙂
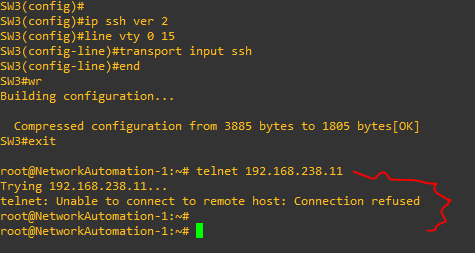
The “ip ssh ver 2” enables SSH ver 2, then log into your lines and configure it to ‘transport input ssh’ which will refuse any other connection type as shown here:

Important Note – Automating this in a Production Network should never be done, even if you have console access, imagine walking around having to console into 30 switches if something somehow goes wrong!
However given this is an Automation lab, I automated it 🙂
That being said, for any Automation on this Topology going forward I will need to completely re-write scripts to use Netmiko / SSH as I can no longer use the Telnet Library import at the top of my scripts unless I turn it back to Transport Input All (which I am going to try avoiding at all costs to push through with SSH).
However I do now have SSH Access to it through Putty on my Local Laptop:

Hit “yes” to agree that you trust the self-signed 2048-bit cert created, and then the creds:

And I am in!
With the NetworkAutomation host it is a bit more odd to log in via SSH:

I guess its just more odd to me as I am not a real huge Linux Superuser, and admittedly have not done a lot of SSH sessions from it, so the username@IPaddress from a Linux Shell is just a bit odd but all the same it does work!
Now going forward I will be diving into Netmiko / SSH configurations on the lab!
Again I only automated the SSH enable / Telnet disable because its a lab for fun, so just don’t ever do that in production, ever ever, ever! Ever!!!
However I do encourage any Network Engineer to update all network devices (very carefully) with SSHv2, and then you can write a script to standardize new usernames with strong passwords like g3Tf0ofMyD3v1c3s!$#9485 and use a free tool like ‘Keepass’ that encrypts and stores long difficult passwords, and change them regularly.
Anyways two labs down in one Friday night, still got it! See you on the next one! 🙂
